
Why nail length matters more than people think
Vinyl siding looks simple to hang, which is exactly why so many installs go wrong. The panel itself is forgiving in heat and cold, but the fasteners holding it to the wall are not. Use a nail that is too short and the panel pulls loose in a strong gust. Use one that is too long and it can split the panel's nailing strip or bind into a stud at the wrong angle, both of which show up later as waves and gaps in the wall.
In Colorado's wind and temperature swings along the Front Range and into Northern Colorado, siding expands and contracts more across a year than it does in milder climates. That movement is normal and planned for in how vinyl siding is engineered, but only if the nails are the right length, the right type, and driven the right way. Get that wrong and the siding fights the fasteners instead of sliding against them the way it is supposed to.
What actually holds a vinyl panel to the wall
Vinyl siding isn't nailed down tight like a shingle or a board. It's hung loosely on a nailing strip, with a fastener driven through a slotted hole that lets the panel move side to side as the temperature changes. The length and type of fastener used has to account for everything the nail has to pass through before it reaches something solid.
The layers a nail passes through
A typical wall assembly under vinyl siding includes the siding panel itself, a layer of house wrap or building paper, often a layer of foam or fiberboard insulation board, then the sheathing, and finally the wall framing. Every one of those layers adds thickness the fastener has to clear before it bites into solid wood.
This is why there's no single universal nail length that works on every house. A home with half-inch foam backer board under the siding needs a longer fastener than a home with none. Measuring the actual wall buildup, not guessing, is the only way to land on the right length.
Why roofing nails get used at all
Roofing nails show up in siding work because they share a useful feature with proper siding nails: a wide head. Vinyl siding's nailing slot is slotted and oversized on purpose, and a wide nail head keeps the fastener from pulling through that slot in high wind. A narrow finish nail or a trim nail will not do this job safely.
That said, roofing nails aren't a perfect substitute for siding nails. Purpose-made siding nails are corrosion-resistant, sized specifically for common wall assemblies, and often have a slightly different shank designed to sit flush without over-driving. A wide-head roofing nail can work in a pinch, but it's not the first choice a trained installer reaches for.
| Wall buildup | Typical fastener length needed | What to watch for |
|---|---|---|
| Siding over bare sheathing | Shorter fastener, enough to clear sheathing and bite framing | Overdriving splits the nailing strip |
| Siding over foam backer board | Longer fastener to clear the extra foam thickness | Under-length nails miss the stud entirely |
| Re-side over existing siding | Longest fastener option, accounting for the old layer | Easy to underestimate total thickness |
The nailing strip and why it's slotted
Every vinyl panel has a nailing strip along its top edge, and that strip has oval or slotted holes instead of round ones. The slot is the whole trick to a siding install that survives Colorado's temperature range. It lets the panel shift left and right behind the fastener head as it expands in the heat of a July afternoon and contracts in a January cold snap.
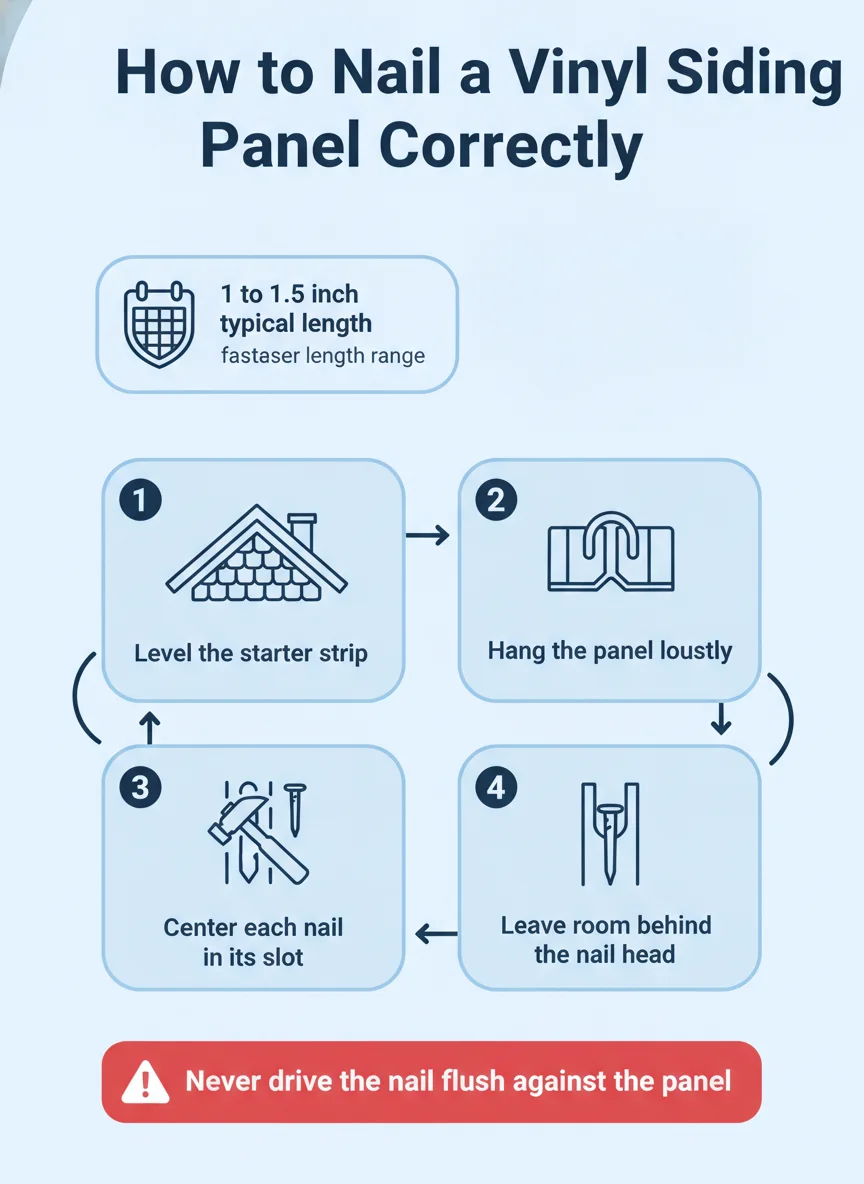
A nail driven dead center in the slot, with just a bit of give left so the panel isn't pinned tight to the wall, is the standard a careful installer works to. Drive the nail all the way home and you've taken away the panel's ability to move, which is exactly the failure mode that causes buckling and oil-canning down the road.
Step-by-step: how a panel should be fastened
The process is straightforward once the wall buildup and fastener length are sorted out. Here's the general sequence a careful crew follows on a typical wall section.
- Lock the starter strip: The bottom starter strip gets leveled and fastened first, since every panel above it keys off that line.
- Hang the panel loosely: The panel clicks into the strip below it and hangs in place before any fastener goes in.
- Center the nail in the slot: Each fastener goes through the middle of its slot, never pushed to one end.
- Leave a gap behind the head: The nail head sits close to the strip but not snug against it, leaving room for seasonal movement.
- Space fasteners evenly: Nails go in at consistent intervals along the strip so the panel hangs flat without any section sagging.
- Check for free movement: A properly hung panel can still be nudged side to side by hand after the last nail is set.
What a bad nailing job looks like later
Wavy or rippled panels
Buckling is the most common sign that siding was nailed too tight. When fasteners pin the panel instead of letting it float, the material has nowhere to go when it expands, so it bows outward in waves you can usually see from across the yard, especially on a south-facing wall that takes the most direct sun.
Buckling isn't just cosmetic. Over time, the stress on a pinned panel can crack the nailing strip itself, and once that strip fails, the whole panel can detach in a wind event instead of just rattling.
Loose or missing panels
The opposite problem, fasteners that are too short or not seated into solid framing, shows up as panels that rattle in the wind or pop loose at a corner. A nail that never found the stud is only holding on by the thickness of the sheathing, which isn't built to carry that load long-term.
On older homes, this is often discovered during a siding and exterior evaluation after a windy stretch, when a homeowner notices a panel flapping at the bottom edge or finds one on the ground after a storm.
What a homeowner can handle versus what needs a pro
A single loose panel that popped out of its lock can sometimes be re-seated by hand if the fasteners below it are still sound. Snapping a panel back into its track and checking that it sits flush is reasonable for a homeowner comfortable on a ladder.
Anything involving removing and re-nailing multiple panels, replacing a section with new material, or diagnosing why a whole wall is buckling is a different job. Matching the wall buildup to the right fastener, keeping courses level across a long run, and making sure the j-channels and corner posts tie in correctly takes experience most homeowners don't have reason to build up.
A full re-side, or even a partial section replacement after storm damage, is worth having a licensed exterior contractor handle. Getting the fastener length and nailing technique wrong on a whole wall creates a problem that's expensive to fully correct later, far more than it would have cost to do right the first time.
Getting it right the first time
Vinyl siding is a durable, low-maintenance product when it's hung correctly, and nail length is one of the smaller details that makes the biggest difference in how it holds up over the years. The wall buildup, the fastener type, and the nailing technique all have to work together, and skipping any one of them shows up as buckling, gaps, or loose panels down the line.
If you're weighing a re-side or need storm-damaged panels replaced on a home anywhere from Westminster to the rest of the Denver Metro area, it helps to read up on how wind damage shows up on a wall before you call anyone out. Virtuous Roofing and Exteriors handles siding and exterior work alongside roofing, so the whole exterior gets looked at as one system.
Frequently asked questions
What size nail do you use for vinyl siding?
Vinyl siding needs a wide-head fastener long enough to clear the wall's sheathing and insulation layers and still bite into solid framing. The exact length depends on the wall buildup behind the panel, which is why it has to be measured rather than assumed.
Can you use roofing nails on vinyl siding?
A wide-head roofing nail can work because its head is broad enough to hold the panel's slotted nailing strip, but purpose-made siding nails are the standard choice since they're sized and coated specifically for the job. Either way, the nail has to be driven loosely, not flush.
Why is my vinyl siding buckling?
Buckling almost always means the panels were nailed too tightly, which stops the material from expanding and contracting with temperature changes the way it's designed to. It can also happen if the wrong fastener length pinned the panel against the wall instead of letting it float.
Should vinyl siding nails be driven in all the way?
No, siding nails should stop just short of flush, leaving a small gap so the panel can still shift side to side in its slot. Driving a nail home like you would on a shingle is one of the most common vinyl siding mistakes.
How do I know if my siding was installed correctly?
Correctly installed vinyl siding sits flat without waves, and individual panels can still be nudged slightly by hand even after installation. Visible buckling, gaps at the seams, or panels that rattle in the wind are signs the nailing wasn't done to spec.